If you have Analytics installed on your website (and if you don’t why not?), then one of the more interesting reports for most people will be Referrals. It’s only natural to want to know which other websites are sending you traffic, and how much. And for a lot of websites, referral traffic will be a very significant proportion of both total traffic and meaningful traffic.
So it’s really frustrating when you look at a report and see that much of the traffic you’re getting from other websites seems to be what is called ‘referer spam’. If you see plenty of referrals supposedly coming from sites like semalt.com, traffic2money.com, floating-share-buttons.com and 4webmasters.org, all with very low pages per session and session duration, then you’re seeing referer spam.
(If you’re wondering what the spammer gets out of this, the short answer is that they’re trying to manipulate the way that search engines rank sites for their own benefit, although some of the referer spam URLs you may see can be infected with malware.)

Referer spam is flipping annoying and is going to make some of your Analytics stats pointless. So can you fix it?
There are complicated methods to fix this problem involving very technical changes to files held on your server. Get something wrong with this and you could mess up your site completely. If you really want to do this, find an expert to do it (and no on this occasion, that’s not us).
Instead, what we have here is a pretty good, pretty quick and easy solution that you can implement yourself. It’s fairly simple if you follow my instructions. And while it isn’t an absolutely perfect solution, it will make your referrals stats real enough.
(If you think this step-by-step guide looks daunting, feel free to get in touch with us and we can do it for you.)
- Log into your Analytics account and go to the Reporting tab.
- Set the date range to something reasonably long (say the last six months or so).
- In the left-hand menu, select Audience -> Technology -> Network.
- Select ‘Hostname’ as the primary dimension. See below:
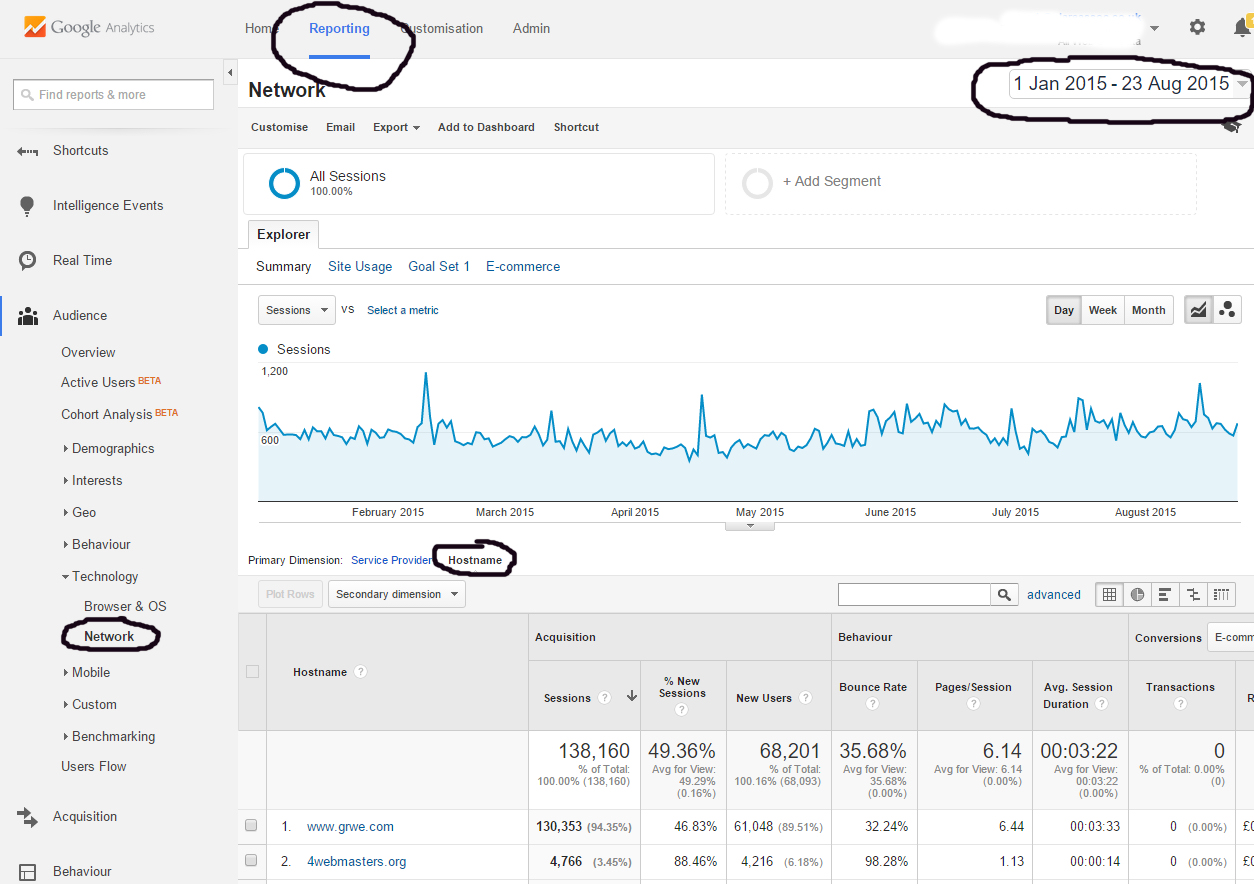
- Beneath the table, you will be able to select how many rows to display. Display the first 50.
- Now get a notepad out. Look the list of hostnames and carefully note down any hostnames where your Analytics tracking code was pasted. So include your own website domain (obviously) plus other domains that you also track together with this one (perhaps a blog site or a shop site under a different domain).
- There’s a decent chance you’ll see translate.googleusercontent.com in that list too. This is also a valid hostname that you will want to note down. (It’s Google’s translation service.)
- Most of the hostnames will be nothing to do with your website. Some will be obviously spammers, some will have domains that are a seemingly random jumble of letters and numbers and some will be well known websites like google.com and amazon.co.uk that are nevertheless nothing to do with your website. You want to ignore all of these.
- So you’ll have a fairly short list in your notepad of domains you wrote down in steps 6 and 7. It might look something like this:
- www.yourowndomain.com
- shop.yourotherdomain.co.uk
- yourowndomain.com
- translate.googleusercontent.com
- Now click on Admin at the top of the Analytics page.
- Make sure you have the correct Account and Property selected. Then, in the View column, click on the drop down box and see what Views you have set up. You may well just have a simple ‘All Website Data’. You may also have other views set up with existing filters. It’s worth keeping one completely raw, unfiltered view as a check against anything else you do, and this might be ‘All Website Data’. Because of this, you’ll want to create a new view called something like ‘Anti-Referer Spam’:
- From the View drop-down, click on Create New View, select ‘Website’ for ‘Which data should this view track?’, give your view a name, select the right timezone (note that for some reason it defaults to no daylight saving, so you’ll probably want to change this) and click on Create View.
- You’ll now be back on the Admin screen. Again click on the View drop-down and you will see your new view listed. Now you want to ensure that it has the same settings as your raw ‘All Website Data’ view, so select ‘All Website Data’ or whatever your raw data view is called and then View Settings, and note down the settings. Then go back and select the new view, click on settings and reproduce those settings in the new view.
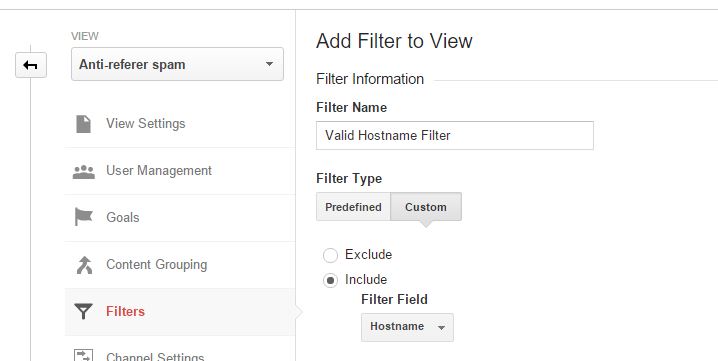
- Now we get to the clever bit. We’re going to tell Analytics to ignore all hostnames except for the ones you noted down in steps 6 and 7. Go back to the Analytics Admin screen and make sure you have your new View selected in the View dropdown. Then click on Filters.
- Click the red +New Filter button.
- Type in something like ‘Valid Hostname Filter’ as the filter name. Select ‘Custom’ as the filter type. Click on the ‘Include’ button. Then select ‘Hostname’ from the drop-down. (IMPORTANT – make sure you have Include selected, not Exclude, otherwise your results will be completely wrong!)
- Now get your notebook out and look at your list of valid domains. Type them into the Filter Pattern box, but change them as follows:
- Ignore any ‘www’.
- Separate each domain from the next with the ‘|’ character. (On a regular UK PC keyboard, you get this character by holding down Shift and hitting the key to the left of ‘Z’.)
- But don’t put a | at the beginning or end.
- For every ‘.’ in your domains, insert a backslash ( \ ) just in front of the dot.
- For every ‘-‘ in your domains, insert a backslash ( \ ) just in front of the hyphen.
- Don’t leave any spaces.
- So if your notepad has the following domains:
- www.yourowndomain.com
- shop.yourotherdomain.co.uk
- yourowndomain.com
- translate.googleusercontent.com
- …then you would type the following into the Filter Pattern box:
- yourowndomain\.com|shop\.yourotherdomain\.co\.uk|translate\.googleusercontent\.com
- Before you save, you can verify your filter by clicking on ‘Verify this filter’. (Having said that I find that the ‘estimation service’ is often unavailable. Worth coming back later if you find this to be the case.)
- Click on Save.
And you’re done. In future, as long as you select your new Analytics view, you shouldn’t see much if any referrer spam in your data from now. Unfortunately, the fix isn’t retrospective, so you will see it in historical data.
The only maintenance that is required is that if you add another valid hostname (like another domain that you want to track as part of your overall Analytics tracking), you will have to add it to the Filter Pattern box using steps 17 and 18.
Mark Poles holds the Google Analytics Individual Qualification.